No products in the cart.
I’ve been spending some time going through old data to see what is worthy of reprocessing. The weather in southern Ontario really hasn’t been very cooperative for astrophotography with even the clear nights having a haze blanketing them.
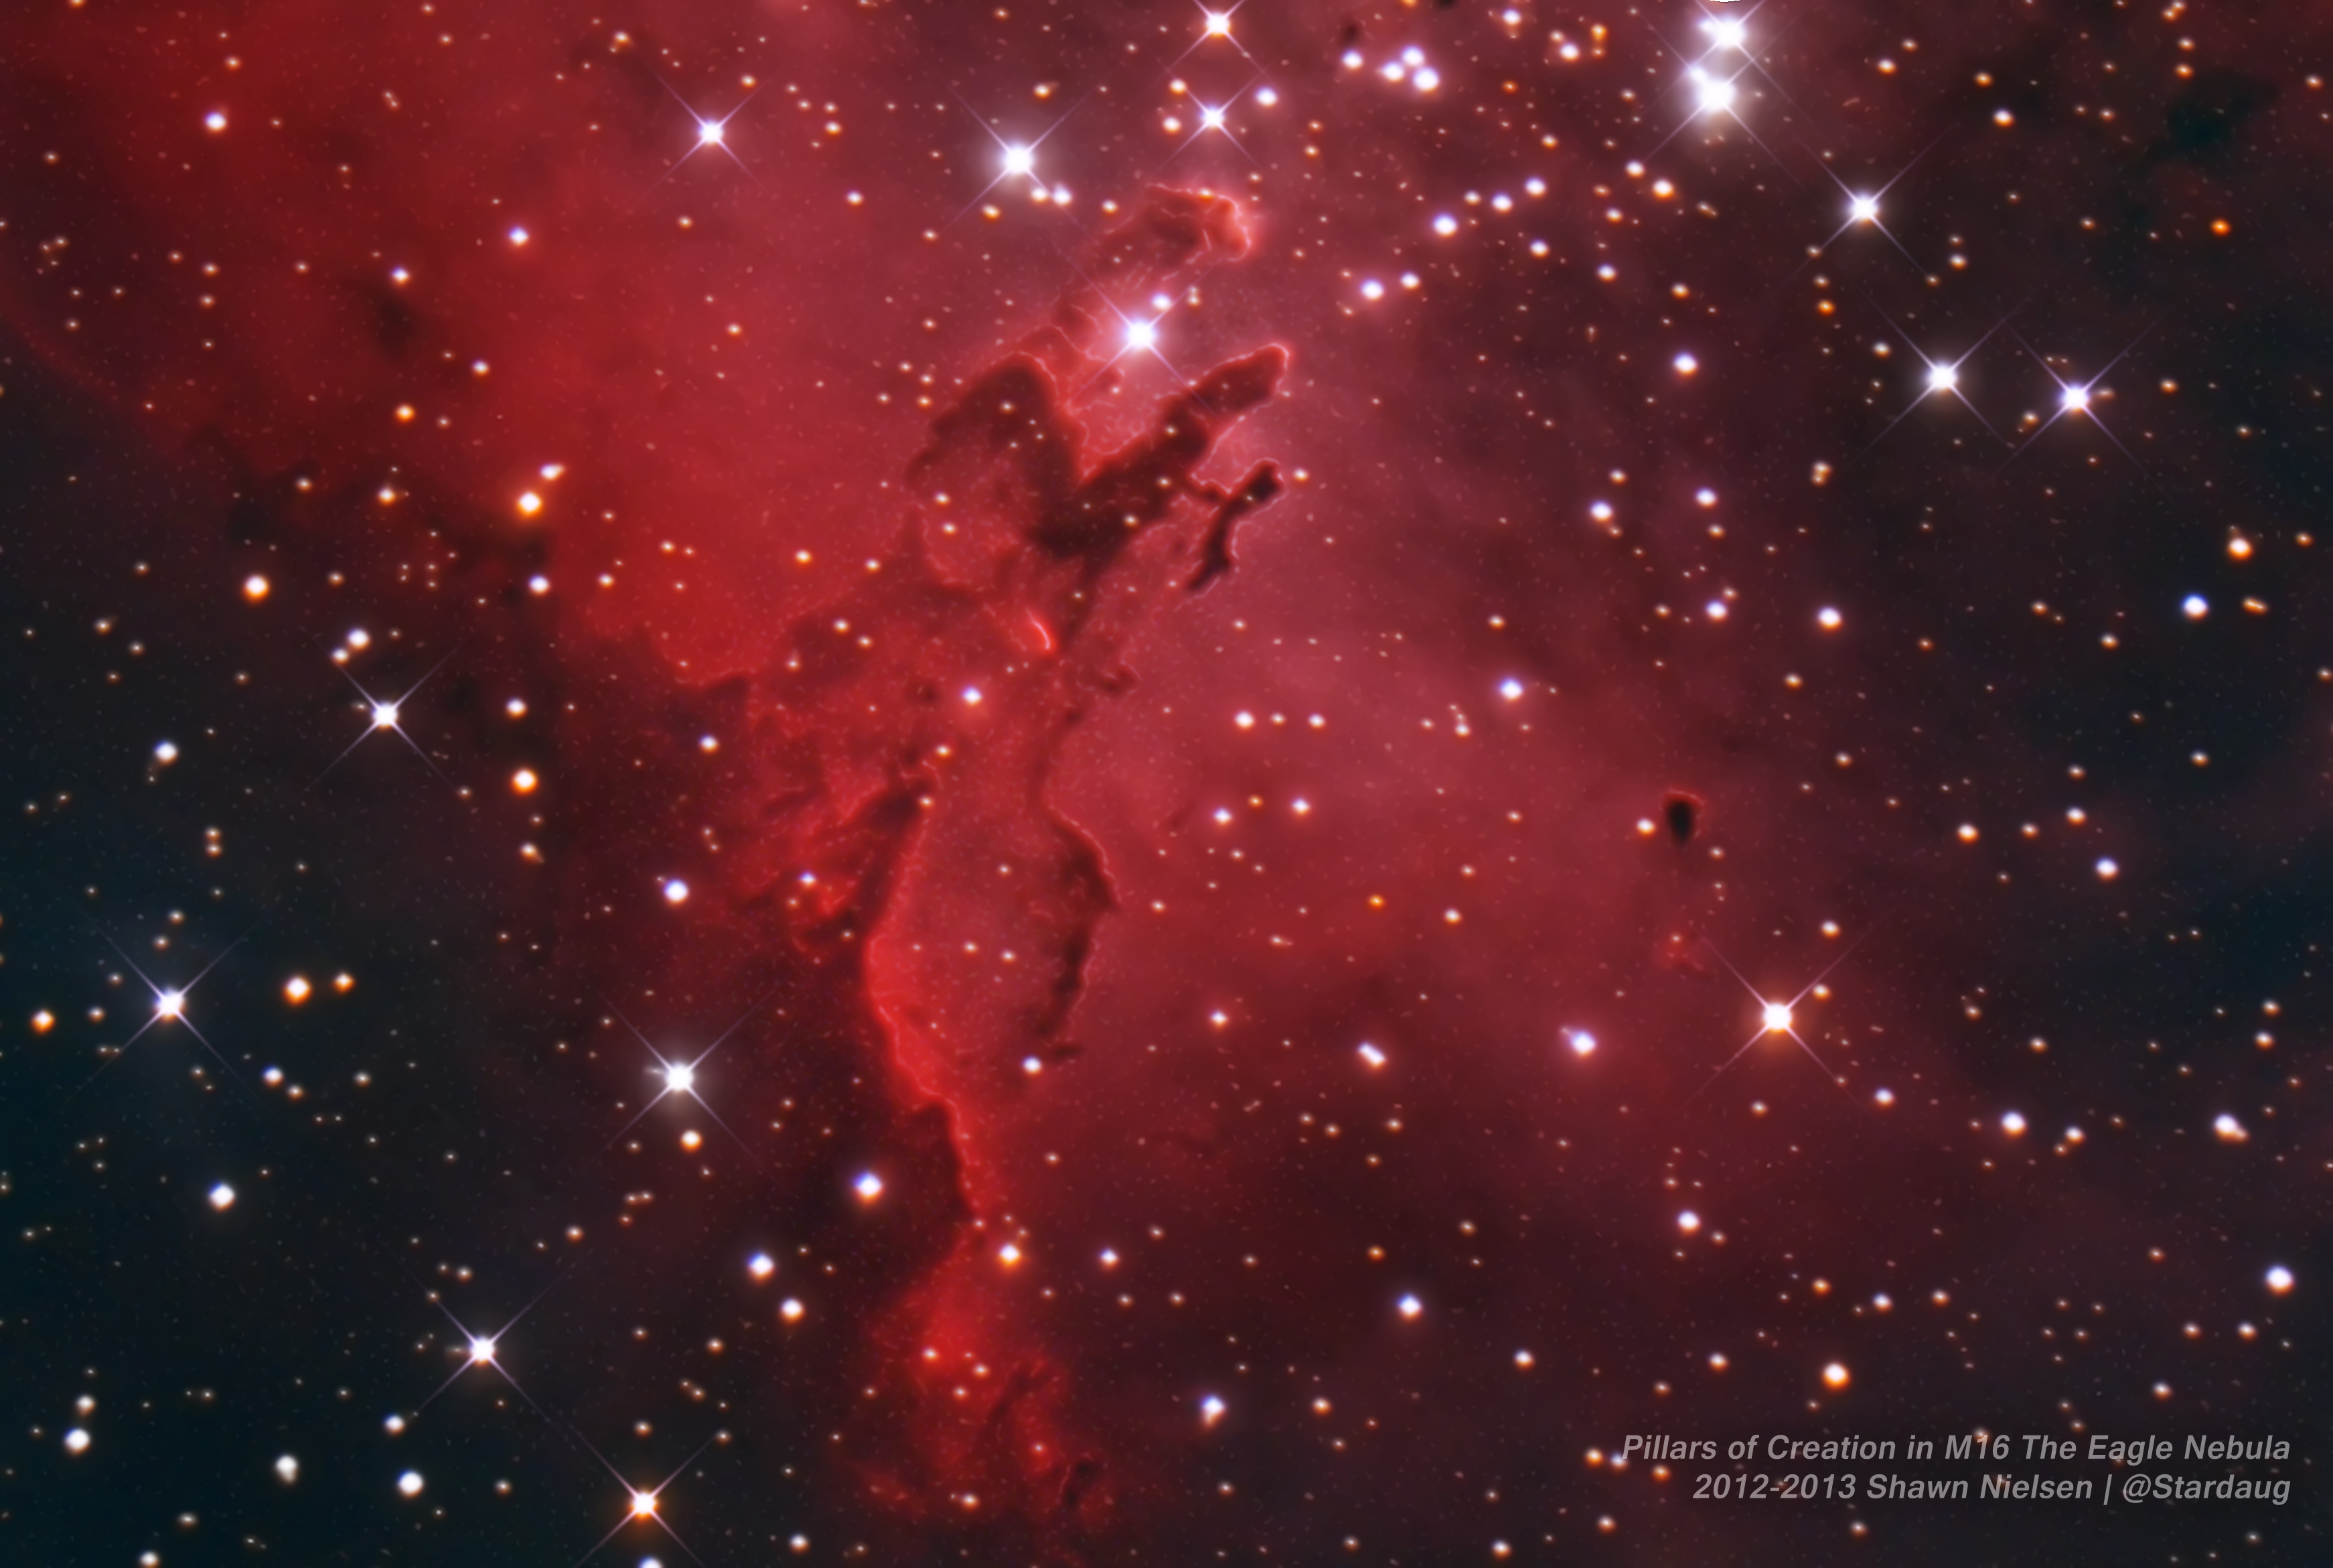
With not a lot of new data to process I’ve had more time to re-visit some of my old images and apply new techniques in processing them. I’ve always liked the results I got on M16 the Eagle Nebula back in 2011 when I imaged it with my CPC800 SCT. M16 and the “pillars of creation” in particular, were photographed by the Hubble Space Telescope a few years back. Wish I had a space telescope!
While this old data of M16 I acquired encompassed the entire nebula I was interested in focusing in on the pillars of creation with my reprocessing of it. As the years have passed, I’ve garnered some new insight and techniques for processing astro-images and applying them to old data is always an interesting exercise.
I keep all of the data I collect with my astrophotography, from the raw files gathered out in the field under the stars, to the calibration files to the unstretched stacked images. It’s all there with notes detailing the equipment used, location, temperature and sky conditions. For reprocessing this makes it very easy.
 View the high res PNG of this image here
I brought the unstretched stack image of M16 into PixInsight which I had already colour balanced in Nebulosity. (Update: I now colour balance in Pixinsight understanding the process better)
The first thing I did was use the dynamic crop tool. There are different reasons one might do this, everything from removing the unwanted data around the outside edges left over from differences in stacked images and their orientation when combining several nights of work to just framing your masterpiece. Framing my masterpiece was my specific purpose for cropping the image, focusing on the pillars of creation within M16.
The next step was deconvolution. This essentially helps correct for poor seeing. Similar to what NASA had to do with the Hubble Space Telescope when it first was launched into orbit and had optic problems which were blurring the images. Before we can decon though we need to create a mask which will help protect the area surrounding the nebula and the pillars of creation. We only want to apply the decon to the nebula details, not the entire image. We’ll also need to create a star mask to protect the stars when applying decon. If we don’t then dark rings will surround your stars and we don’t want that. Once the masks are created and implemented the deconvolution can begin. To see the difference decon can make, click on the GIF image at right to see a before and after animation. It should be noted that all of the deconvolution is done on an unstretched image at this point in the processing.
Next we want to stretch the stacked image and reveal the nebula and details. You’ll always want to stretch an image using the histogram transformation tool in PI or the Levels tool in PS. Do not use the curves tool as this will blow out (over brighten and saturate your stars). Always move the grey point (middle of the three sliders) to the left of the histogram which will start to reveal more of the object imaged. Then move the black point slider to the right being careful not to clip any of the data – this will darken the surrounding areas. Repeating this a few times will reveal the hidden information in your stacked image and bring out the nebulosity. The trick is finding the balance with this – you want to reveal the nebula (in this case) without over-doing it.
Moving along in our processing, you’ll probably want to add some colour saturation to your image. I’ve usually found a value 20 is good in most cases but you may have to play with this to see what works best for your image. Saturation will take your image from looking dull to vivid with cosmic colour. There are different techniques for this, some avoid adding saturation to noise, but if you’ve acquired enough data on an object and applied correct darks (or used a cooled CCD) then noise saturation really shouldn’t be an issue. If it is, adding more data (subs/lights) to your image will definitely help improve the SNR (signal to noise ratio) and the overall quality of your astro image.
Applying curves will be your last step. This helps boost contrast in your image. Making things pop from within it. As with levels, the key here is to not overdo to it. You don’t want to blow out your stars or make the image look to aggressive and thus not very visually appealing. This is after all artistic expression! We are painting a celestial portrait and want to make it “look” both beautiful and amazing. An “S” shape curve is usually the best approach in fine-tuning your image. Both Photoshop and PixInsight have curve adjustment tools.
These were the basic steps I used to reprocess my M16 Eagle Nebula image. You’ll find most of the time that processing different astro images will involve the same basic steps to achieve the final result. You can also experiment though as I do. You can also add in some extra steps which help improve the look of your astro photos such as star reduction and noise reduction by way of masking. PixInsight in particular has a very powerful noise reduction script that doesn’t attack your object details and blur or soften it. Very cool stuff! These techniques are of course for another article so stay tuned!
Technical:
Pillars of Creation in M16 The Eagle Nebula. Reprocessed data from 2011. 4.5 hours total. Celestron CPC800 SCT and Canon (modified) 350D DSLR.
Thanks for reading and #ClearSkies
My story began more than 40 years ago looking up at the Moon with a small telescope my Father had. Encouraged by my parents, who bought me my very own telescope, a 4.5″ reflector, I began to explore the night sky from my family home backyard. Today I do astrophotography from my home in Kitchener, Ontario and also with remote telescopes located in New Mexico and Australia. Some of my images have won awards and have been featured online and in magazines.